Are you tired of struggling to hear phone conversations or enjoying your favorite tunes on your Samsung Galaxy S21? Worry not. We are here to help you! This step-by-step guide quickly shows you the Samsung Galaxy S21 Earpiece Speaker Replacement. Don’t panic! We’ll explain everything so even if you’re not a tech whiz you can do it too!
Forget about spending your hard-earned money on expensive repairs or settling for subpar sound quality. Following our easy instructions you can return the clear crisp audio you’ve missed. Are you ready to enjoy your phone calls and multimedia like before? Let’s begin the Samsung Galaxy S21 Earpiece Speaker Replacement!
Step 1—Necessary Precautions Before Starting Samsung Galaxy S21 Earpiece Speaker Replacement
When working on electronic devices like the Samsung Galaxy S21 it’s essential to prioritize safety and take necessary precautions. By following these safety measures you can ensure a smooth and risk-free earpiece speaker replacement process.
Prioritize Personal Safety
Before starting any repairs ensure you are in good health and have a clear mind. It’s important to be alert and focused throughout the process.
Power Off the Device
Always power off your Samsung Galaxy S21 before attempting any repairs. This will minimize the risk of electric shock and prevent accidental device damage.
Prepare a Clean Workspace
Find a well-lit and clean area to work in. A clutter-free environment reduces the chances of misplacing small components and helps you stay organized throughout the repair.
Gather the Necessary Tools
Make sure you have all the required tools readily available. These may include a small Phillips screwdriver a spudger tweezers and a plastic opening tool. Using the right tools will make the process easier and minimize the risk of damage.
Wear Protective Gear
Protect your hands and eyes by wearing appropriate safety gear such as gloves and safety glasses. This will safeguard you from potential injuries and ensure a safer repair experience.
Handle Components with Care
Treat all components and connectors with caution. Avoid applying excessive force or bending delicate parts. Gentle and precise handling will prevent damage to the device and its internal components.
Keep Track of Screws and Small Parts
As you disassemble the device keep screws and small parts organized. Utilize a magnetic mat or small containers to avoid misplacing or losing them.
Well after attempting all the necessary precautions move to the further step of Samsung Galaxy S21 Earpiece Speaker Replacement.
Step 2—Gather Required Tools and Parts for Samsung Galaxy S21 Earpiece Speaker Replacement

You will need the following tools and parts to replace the earpiece speaker on your Samsung Galaxy S21 successfully. Having these items ready beforehand. It will ensure a smooth and efficient repair process.
Phillips Screwdriver
A small Phillips screwdriver is essential for removing the screws that secure the device’s components. Make sure to use the appropriate size to avoid damaging the screws.
Spudger
A spudger is handy for opening the Samsung Galaxy 21 and disconnecting delicate connectors. Its flat and pointed ends allow for precise and safe maneuvering.
Replacement Earpiece Speaker
Obtain a high-quality replacement earpiece speaker that is compatible with the Samsung Galaxy S21. Ensure it matches the specifications of the original speaker to ensure optimal performance.
Plastic Opening Tool
A plastic opening tool will help you safely separate the phone’s components without causing any damage. Its non-conductive material reduces the risk of electrical shock.
Tweezers
Fine-tip tweezers will assist in handling small components and connectors with precision. They allow for a firm grip and help prevent accidental slippage.
Adhesive
Depending on the replacement speaker you may need adhesive to secure it. Double-sided adhesive tape or adhesive strips are commonly used for this purpose.
Cleaning Cloth
A soft microfiber cloth will come in handy for cleaning any dust or fingerprints from the device’s surfaces during the repair process.
Magnetic Mat or Container
Use a magnetic mat or small containers to keep track of screws and small parts. This prevents loss or confusion when reassembling the device. (This Magnetic Mat or Container is optional)
You are ready to proceed with the earpiece speaker replacement process for your Samsung Galaxy S21.
Step3—Power Off Your Samsung Galaxy S21 And Take Off the SIM Card Tray


Power off your Samsung Galaxy S21 and remove the SIM card tray
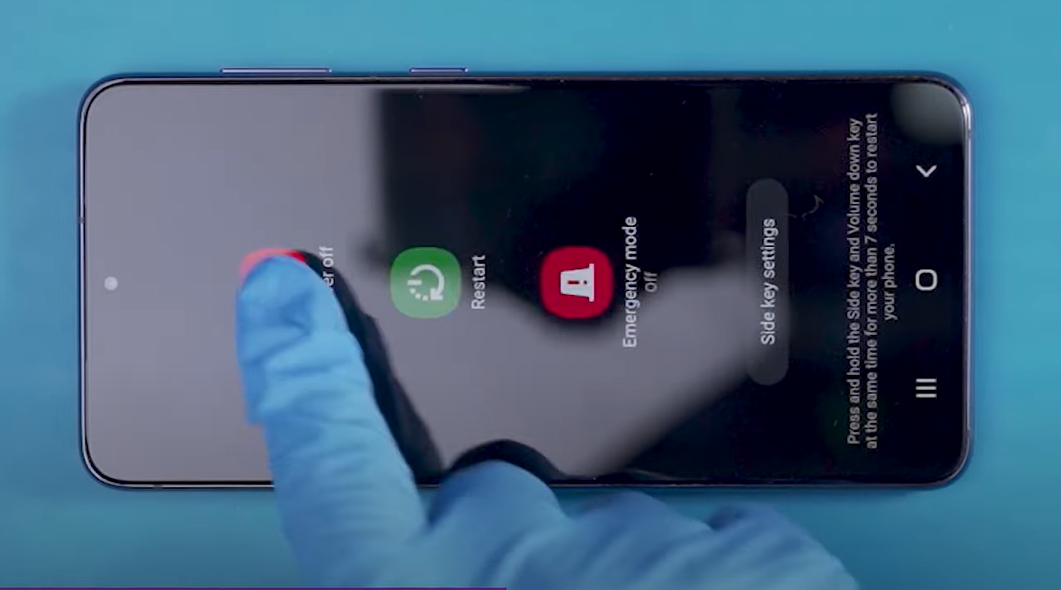
- Press and hold both the side and volume down buttons simultaneously.
- After a few seconds a menu will appear on the screen.
- Tap on “Power off” from the menu options.
- Confirm the action by entering your unlock code.
- Once powered off you can safely remove the SIM card tray.
Remove the SIM card tray from your Samsung Galaxy S21

- Locate the SIM card tray slot on the bottom of your Galaxy S21.
- Insert the SIM eject tool or a small paperclip into the small hole next to the slot.
- Apply gentle pressure to push the tool into the hole until the tray pops out slightly.
- Carefully pull the tray out using your fingers or the tool.
- Remove the SIM card from the tray if needed.
- To reinsert the tray align it with the slot and gently push it back into place until it clicks securely.
Step4—Heat Up The Back Of The Galaxy S21

Warm up the back cover of your Galaxy S21 by evenly running a hot air Gun along its edges. This will help loosen the adhesive and make it easier to remove the cover without causing any damage. Be cautious while applying heat and ensure it is evenly distributed for effective results.
Step5—Remove the Back Cover Gently


To remove the back cover start by attaching a suction cup to the lower edge of the cover and gently pulling it upwards. At the same time insert a plastic opening tool between the display unit and the back cover to separate them gradually. Do not apply excessive force and work slowly to avoid damage.


Note: If you’re having trouble removing the back cover use a suction tool to lift it easily. Additionally inserting a plastic opening tool between the display unit and the back cover can help prevent them from sticking together again. Take your time and proceed carefully to avoid any damage.
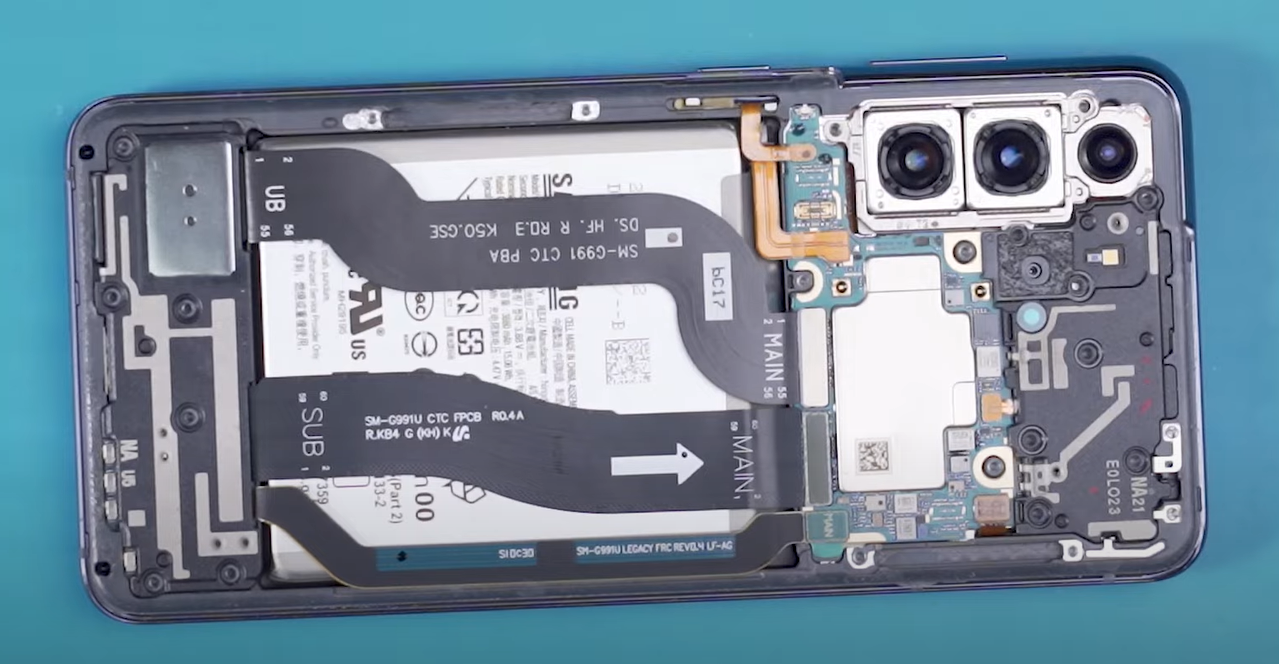
Step6—Open All The Screws After Removing the Back Cover


Once the back cover is removed loosen all the screws on the Samsung S21 using an appropriate screwdriver. Make sure to keep the screws organized and safe to avoid misplacement. Taking this step will allow you to access the internal components of the Samsung Galaxy S21 for further proceeding to repair earpiece speakers or replacements.
Step7—Gently Remove the Charging Coil


To remove the charging coil carefully lift the metal NFC antenna. Now detach its battery connection from the motherboard by gently pulling it away. You plastic spudger for this. Carefully leverage the black connector of the charging coil of the circuit board. Take your time and ensure a steady grip to prevent any damage. The charging coil is delicate so handling it with care is crucial. You can proceed with the earpiece replacements for your Samsung Galaxy S21 by disconnecting the charging coil.
Step8—Detaching the Earpiece Connector and Removing the Earpiece Speaker


Detach the earpiece connector by gently disconnecting it from the motherboard. Once the connector is detached you can remove the earpiece speaker from its position. Take care not to apply excessive force and handle the speaker delicately to avoid damage.

Step9—Installing the New Earpiece Speaker
It’s time to install the new speaker in your Samsung Galaxy S2. Prepare the earpiece and put it on the phone to settle it in its place.

Step10—Securely Attach the Earpiece Speaker to the Motherboard


Carefully tighten the screws on the earpiece speaker using a suitable screwdriver ensuring a secure and snug fit. Take care not to overtighten to avoid any damage. Confirm that the earpiece speaker is securely connected to the motherboard ensuring proper functionality and sound transmission.
Step11—Installing Charging Coil


Carefully align the charging coil over the designated area on the motherboard. Ensure that it fits snugly and lines up with the screw holes. Press the glued end of the charging coil onto the motherboard to secure it.
Step12—Connecting the Charging Coil And Securing the Power Connection

- Lift the metal cover of the charging coil to expose the black connector underneath.
- Carefully align the black connector with its corresponding port on the circuit board.
- Press the black connector onto the port until it clicks into place ensuring a secure power connection.
Step13—Attaching the Battery Connector And Restore the Power Connection
- Locate the orange battery connector on the motherboard.
- Align the connector with its corresponding port on the battery.
- Carefully press the connector onto the port until it securely attaches restoring the power connection.
- Ensure the connector is fully inserted and seated correctly to prevent loose connections.
Step14—Securing the Metal Cover

With the battery and charging coil successfully reconnected follow these steps to secure the metal cover.
- Position the metal cover over the designated area aligning it with the screw holes.
- Carefully insert the screws into their respective holes on the metal cover.
- Using a screwdriver tighten each screw firmly but avoid excessive force.
- Double-check that all screws are securely fastened to ensure proper protection and stability.
- The metal cover is now securely in place providing added protection to the internal components of your Samsung Galaxy S21.
Step15—Testing and Troubleshooting

Once the earpiece speaker replacement is complete testing its functionality and ensuring other components are working correctly is essential. Follow these steps for testing and troubleshooting:
- Switch on your Samsung Galaxy S21 to power it up.
- Ask someone to call your device to test the new earpiece speaker’s functionality.
- Verify that the sound is clear and audible during the conversation.
- Test other essential components by accessing the Samsung test menu. Open the phone app and dial #0# to bring up the test menu.
- You can navigate various test menu options to check the display touch sensitivity sensors audio and more. Follow the on-screen instructions to perform individual tests.
- Double-check the connections and ensure all components are securely attached if any issues are encountered during testing. Verify that the replacement parts are compatible with your device model.
- If problems persist consult the troubleshooting section in the Samsung Galaxy S21 user manual or seek professional assistance from authorized service centers.
Testing and troubleshooting are the most crucial steps to ensure the successful replacement of the earpiece speaker and to guarantee the overall functionality of your Samsung Galaxy S21.
Step16—Reattaching the Back Cover

To complete the earpiece speaker replacement on your Samsung Galaxy S21 follow these steps to reattach the back cover:
- Align the back cover with the device’s display unit ensuring a proper fit.
- Apply even pressure and press the back cover firmly until it snaps into place.
- Make sure all edges and corners are securely fastened.
- Gently run your fingers along the edges to ensure the back cover is seated correctly.
- Congratulations! Your Galaxy S21 is now fully reassembled and ready for use.
Note: A new adhesive frame is only necessary if the current one is damaged or doesn’t stick well anymore. If you see any problems with the adhesive frame replacing it’s a good idea. This ensures that your Samsung Galaxy S21 stays securely assembled and prevents any issues during use.
By reattaching the back cover you restore the device’s aesthetic appeal and protect the internal components. Enjoy using your Samsung Galaxy S21 with its newly replaced earpiece speaker.
Wrapping Up
We have provided you with a comprehensive guide on replacing the earpiece speaker of your Samsung Galaxy S21. You can complete the repair by following the step-by-step instructions taking necessary precautions and using the recommended tools and parts.
We suggest thoroughly testing the new earpiece speaker’s functionality and addressing any issues that may arise. If you’re still facing difficulties or need help, it’s best to consult a professional for assistance.
By following this guide you can improve the audio quality of your Samsung Galaxy S21 for better call and multimedia experiences. Stay patient and pay attention to detail during the repair process. Thank you for choosing this guide and we hope it has successfully restored your Galaxy S21 to its best performance. For any query feel free to write blew in the comment section.