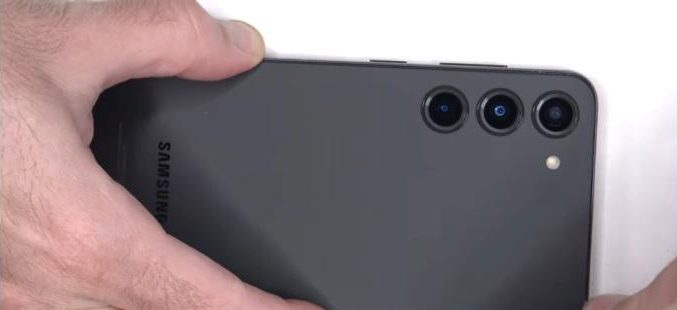
Are you dealing with frustrating cracks on your phone screen? Or has your Samsung Galaxy S23 Plus screen stopped responding to touch? Don’t worry! Following our Samsung Galaxy S23 Plus screen replacement guide can restore the necessary functionality and refresh your device to its full glory. Say goodbye to those screen troubles, take action, repair it at home by following our Samsung Galaxy S23 Plus Repair guide and enjoy a seamless user experience again.
If you need to fix a cracked Samsung Galaxy S23 Plus screen, you can rely on Fixo’s replacement display assembly , which can be easily installed with the appropriate tools. All S23 Plus parts are fully tested and backed by the warranty policy. The Samsung Galaxy S23 Plus (SM-S916) repair kits are available in a range of colors, including Phantom Black, Cream, Green, Lavender, Graphite, and Lime, and include all the tools you need to repair your screen DIY Style at reasonable prices.
 So, if the screen of your smartphone is cracked or completely damaged, rendering it unusable, fear not. I will guide you through the step-by-step process of replacing the screen, even if you’re not a professional.
Let’s get started.
Step 1: Gather your tools
- To successfully replace the screen before we dive into the repair it is important to have the right tools to ensure a smooth process.
- We need essentials like double-sided tape, tweezers, a screwdriver, a metal flat opening tool and a plastic card.
- Additionally, we have an LCD temperature controller but don’t worry if you don’t have one. An ordinary hairdryer can work just as well in this case which can serve as a substitute for the LCD temperature controller.
- Having these tools readily available ensures that you are well-equipped to handle the intricacies of the repair.
Step 2: Eject the SIM Tray
- Now, let us get started with the replacement. The first component we will address is the SIM tray. Before any disassembly, it is crucial to remove the SIM tray.
- To remove the SIM tray, insert a SIM card eject tool into the hole located on the bottom edge of the phone. Apply firm pressure to eject the tray. If you accidentally inserted the tool into the wrong hole, there’s no need to worry as the microphone is positioned at a safe distance and won’t be affected.

Step 3: Remove the SIM Tray
- The SIM card tray will come out easily. Remove the SIM tray and keep it aside.


Step 4: Detach and cut through the adhesive at the bottom
- Attach a suction cup to the back of the phone near the center of the bottom edge.
- Pull the suction cup with strong and steady force to create a gap between the back cover and the frame.
- Insert the pointed end of an opening pick into the gap.
- Due to tight fittings, you may need to repeat the process of heating the phone and using the suction cup to separate the cover multiple times before it comes off.
- If you are having trouble creating a gap, apply more heat to the edge and try again.
- Be careful not to apply too much force with the opening pick to avoid cracking the glass of the back cover.


Step 5: Detach and cut through the adhesive at the left side
- Place a suction cup on the back of the phone near the center of the left edge.
- Pull the suction cup firmly and steadily to create a small gap between the back cover and the frame.
- Insert the pointed end of a praying pick into the gap.
- Note that on the curved edge of the glass, you won’t be able to insert the pick very far. As long as the tip is underneath the edge, you can continue.
- It might take a few tries to create the gap due to the tight fit.
- If you are having difficulty, apply more heat to the edge and try again
- Be cautious not to apply too much force with the pick to avoid cracking the glass of the back cover.
- Once the pick is under the edge of the glass, tilt it downward and insert it further to completely separate the adhesive and detach the back cover.

Step 6: Detach and cut through the adhesive at the top side
- Use a hair dryer or heat gun on the top side of the back cover for two minutes. Be cautious not to overheat the phone as it can damage the display and battery.
- Attach a suction cup to the back of the phone, close to the center of the top edge.
- Pull the suction cup with strong and steady force to create a gap between the back cover and the frame.
- Insert an opening pick into the gap, tilting it downward to fully slide it underneath the back cover.
- Slide the pick towards the bottom edge of the phone to separate the adhesive holding the back cover.

Step 7: Detach and cut through the adhesive at the right side
- Heat up the right edge of the back cover for two minutes
- Attach a suction cup to the back of the phone, close to the center of the right edge
- Pull the suction cup with strong and steady force to create a gap between the back cover and the frame
- Insert an opening pick into the gap, tilting it downward to fully slide it underneath the back cover
- Slide the pick towards the bottom edge of the phone to separate the adhesive holding the back cover
Step 8: Remove the back cover
- Now, let us remove the back cover.
- Gently lift the back cover inserting a plastic pick to cut through the adhesive. While removing the back cover, avoid harming the NFC pad or camera lights.
- Gradually unclip the clips around the frame. The back cover should lift off smoothly. Be cautious not to damage the back cover or fingerprint sensor.

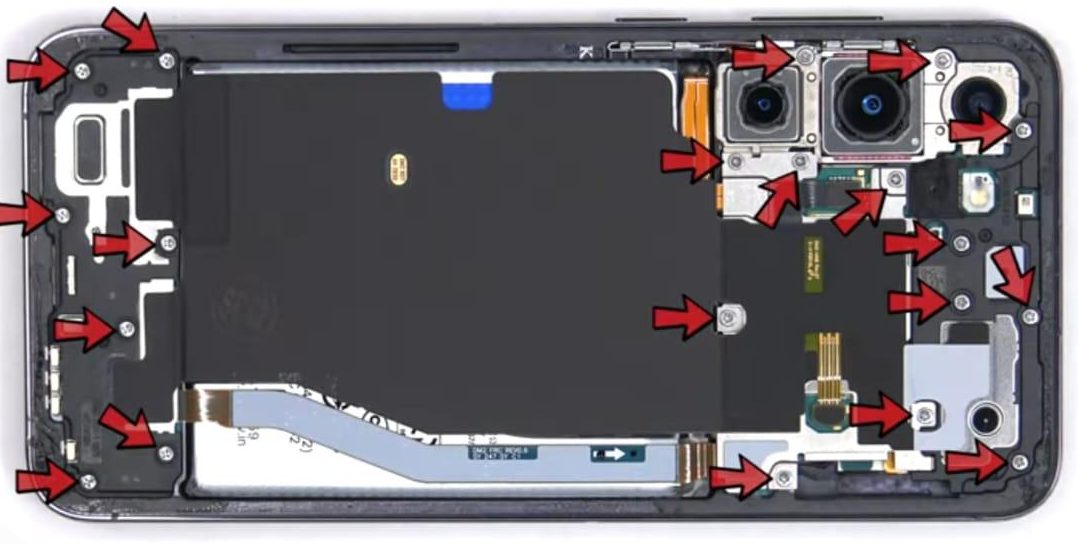
Step 9: Remove the screws and separate the frame
- Locate and remove all the screws on the device. Keep them in order, just in case they differ in size. Keep them organized so you don’t forget to put them back during reassembly. It is a common mistake, so avoid it by staying organized.
Step 10: Disconnect and Remove the wireless charging coils
- To safely disconnect the wireless charging coil connector, use a tool called a spudger to gently lift it up. When doing so, be cautious not to accidentally move or damage the tiny components that are close to the connector.
- Gently separate the wireless charging coil from the device using a pry pick or a pair of tweezers.
- Take out the wireless charging coil.

Step 11: Disconnect the battery terminals
- Use a spurge tool to gently lift and detach the battery connector.


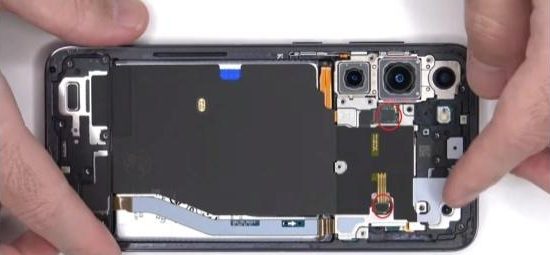
Step 12: Disconnect NFC antenna from the main board
- Identify the NFC antenna on the main board. Gently unplug the connectors by pulling them away from the board
Step 13: Remove the internal board
- Gently remove the internal board, which has a dual-layered structure and is interconnected with the main board. This board houses various components and plays a crucial role in device functionality


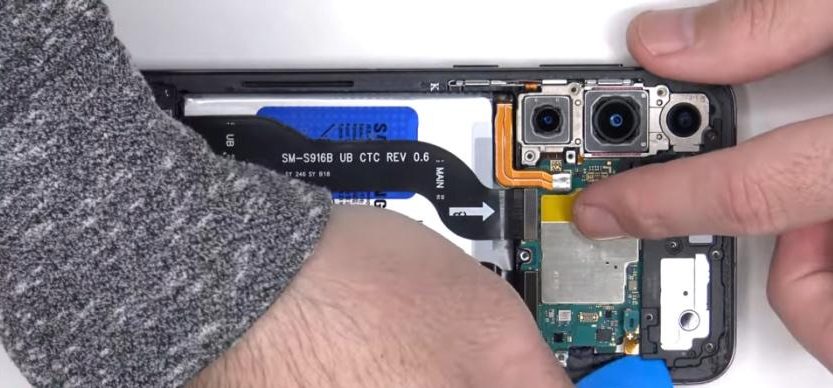
Step 14: Remove the main camera
- The front-facing camera, which has a resolution of 12 megapixels, is secured in position using a cure-in-place gasket adhesive. To remove this camera, it is necessary to meticulously cut around its edges using an X-Acto knife or a razor blade and then proceed with its removal.

Step 15: Remove the speaker assembly
- Insert the pointed end of a pray pick or a pair of tweezers into the small groove located at the bottom left corner. Gently lift and pry to release the clips that hold it in position.
- Take out the speaker assembly carefully.

Step 16: Disconnect the main display cable
- Use a pray pick to carefully lift and disconnect the main flex cables from the sub board near the bottom of the device

Step 17: Disconnect the cable joining main board to the sub board
- Gently lift and separate the main display flex cable from the motherboard.
- When reconnecting press. Press down connectors firmly on one side until you hear a click, then repeat the same on the other side. Avoid pressing down in the middle. Make sure to align them properly. If the connector is not aligned correctly, the pins may bend and cause permanent damage.

Step 18: Remove the battery
- To remove the battery, use the adhesive pull pouch provided to pry it off


Step 19: Remove the screen
- Continue using heat and a plastic pick to lift and separate the screen from the frame. If you are not a professional and don’t have an LCD temperature controller, using an ordinary hairdryer as a heat source can be a suitable alternative
- Start from the top and work your way down. The screen should come off easily. It requires precision and patience

Step 20: Clear away debris and clean the device
- Once the screen is removed, use a razor blade to carefully scrape away any remaining glass fragments. Thoroughly clean the device, ensuring it is free from adhesive or glass residue. It is crucial to have a clean surface before installing the new screen

Step 21: Install the new screen
- Insert the new screen partially through the designated hole
- Opting for the original Samsung replacement is highly recommended to avoid potential issues. Copy screens might cause problems, especially for sensitive and expensive models like the S-Series
- Apply glue around the edges, avoiding the area where the earpiece is located. Properly align the screen by focusing on the top part first, especially the camera area. Plug in the cable and ensure the bottom area is aligned as well. Use clamps to secure the screen, placing them on the corners and edges. Leave the device to dry for at least two hours, ideally overnight

Step 22: Put it all back together
- Once the glue has set, remove the clamps and reassemble the phone. Start by meticulously putting back each component in reverse order. When handling the motherboard, ensure the screws are not over-tightened and the plastic or metal shields are heated and secured properly.
- When reconnecting the flex cables and connectors, be extra cautious. Ensure they are aligned correctly to prevent damage to the motherboard or flex connectors. Keeping everything aligned will ensure a smooth reassembly process.
- As you reconnect the flex cables and connectors, diligently align them correctly. Mishandling these delicate connections can lead to damage and jeopardizing.
Step23: Test the Device
- Once you have successfully reassembled the components, it is the time to put the device to the test. Connect the charging cable, power the device, and thoroughly check the screen’s functionality. Dial a few numbers to ensure everything is in working order. It is essential to ensure that the repairs have succeeded before proceeding further.
Step 24: Attach the back cover
- After thoroughly testing the device and confirming functionality, carefully attach the back cover. Remember that reopening the device after sealing it can be challenging, so it is crucial to be satisfied with your repairs before proceeding
- To ensure the battery stays in place securely, use double-sided tape behind it to provide the necessary adhesion and stability, eliminating any concerns about a loose battery

When Do You Need a Screen Replacement?
In the majority of cases, it is highly recommended to opt for a screen replacement. But if you are unsure whether your situation warrants it, we have got you covered. Take a moment to scroll down and see if your particular issue matches any of the ones listed below.
-
Cracked Glass
If you notice any cracks on the screen’s glass, it is time for a replacement. Cracks can affect the visual experience and lead to further damage if left unattended.
-
Unresponsive Display
When your screen stops responding to touch, it can be frustrating. If you have tried troubleshooting methods to no avail, it is good indication that a screen replacement is necessary to regain full touch functionality.
-
No Screen Lighting Up
Is your screen no longer lighting up when your phone is turned on? It could be a symptom of a damaged screen that requires replacement. Without a functioning display, it becomes challenging to use your device effectively.
-
Vertical Colored Stripes
When you start seeing vertical-colored stripes on your screen, it is a sign that something is amiss. This issue can hinder your viewing experience and may indicate a faulty screen needing replacement.
-
Black Ink Spots
If you spot any black ink spots on your screen, it is a definite sign that something is wrong. These spots can be distracting and interfere with the display’s clarity, so it is best to replace the screen promptly.
Remember, a damaged screen affects your user experience and poses potential risks. So, if you notice any of these signs, consider replacing your Samsung Galaxy S23 Plus screen to restore your device’s performance and enjoy a seamless user experience!
Don’t Settle For Anything Less Than The Best.
When you are upto repair your mobile devices screen by yourself, it is must to have the original parts and right tools. So whether you are a professional mobile repair expert or a newbie beginner who is trying DIY first time, you could trust get your phone parts from Fixo.com.au with warranty to get the highest quality parts, reliable tools and premium support for your Samsung Galaxy S23 Plus screen replacement related stuff in Brisbane, Australia.
Let’s have a look at the price list of different parts
| Tools | Prices |
|---|---|
| iClamp Screen Replacement Clamps 4-Pack | $18.99 |
| Repair Essentials – Magnetic Bits | $1.20 |
| Repair Essentials – Mobile Phone Repair Tool Set | $10.99 |
| Mobile Device Opening Metal Tool – Triangle | $0.99 |
| SIM card ejector – SIM card tray opening tool | $1.25 |
| Device Opening Metal Tool – GB 5A | $1.99 |
| Mobile Phone Opening Pry Tool – Super Thin | $4.99 |
| 2UUL Convex Cross Screwdriver for Mobile Phone Repair – 2.5mm | $10.99 |
| 2UUL Pentalobe Screwdriver for Mobile Phone Repair – 0.8mm | $10.99 |
| 2UUL Tri-Wing Screwdriver for Mobile Phone Repair – 0.6mm | $10.99 |
| Black Glue for Mobile Phone Repair 50ml / 15ml – Ultra Strong | $5.99 |
| Upgraded Repair Master Tool Kit – 17 Piece | $19.90 |
| P5 1.2mm Pentalobe Screwdriver | $4.20 |
You can visit the page to explore more parts and tools you need for Apple, Samsung or Google, Huawei, OnePlus, Oppo and other devices.
Conclusion:
Replacing a cracked screen on a Samsung Galaxy S23 Plus might seem difficult, but following the step-by-step instructions that we have mentioned above, non-professionals or experienced repair person can complete the Samsung galaxy s23 plus screen replacement process easily. Just remember to be patient, careful and follow each step diligently. Also do not forget before sealing the device, test your smartphones screen and other functions to make sure, everything is working fine.